Part One: Upper Back & Shoulders
This week we will begin a new Wellness Wednesday DIY series to learn how we can effectively massage our own bodies and get rid of some long stored tension. You will need 2 balls, a floor, and a wall. Lacrosse balls are a favourite as they are a solid rubber ball that is easy to move around, does not mark up the walls (golf balls can wreak havoc on drywall) and is a little more intense than a tennis ball. They can be found for just a few dollars at most sporting goods stores. The best thing about self-massage is that you know exactly where you need it and you are in control of the pressure given. Please note that if you are pressing so hard into your muscles that you are holding your breath, it is likely you are going to deep. If you are wanting a firmer massage, it could potentially feel uncomfortable however should be completely bearable. Please do not bruise yourself. Listen to your body and avoid direct pressure on bony protuberances. You cannot change the structure of bone with massage, and it hurts!
Let’s dive into the upper back and shoulders first.
Time spent at a desk, on a computer, driving, or reading can all take a toll on our upper body. Think of your head as a large orange on a skinny toothpick. It is mainly the muscles of the neck and upper back that keep our heads up. Watch a newborn baby to see how little support our cervical spine provides. We have to learn to control all of these muscles so we can hold our head up, let alone move it in all different planes of movement. Our cervical spine has the most range of motion of all 3 spinal segments so we can view the world around us and keep ourselves safe. On the flip side, all that spinal movement can result in more injuries or strains in our upper bodies. It is quite common when we sit that we hunch forward, placing the head in a forward position, which makes the muscles in the front and back of the neck work harder against gravity to hold the head up. If you’ve ever felt aches or burning sensations in your upper back, shoulders, and neck muscles after a long period of sitting, this DIY routine will feel fantastic!
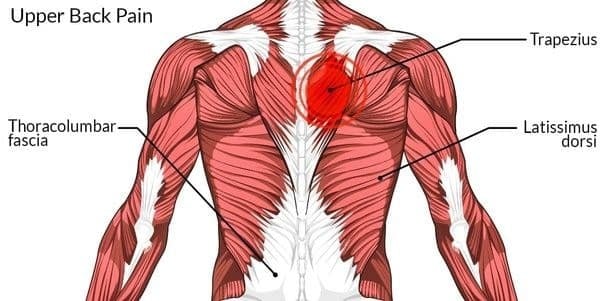
Let’s learn a little bit of anatomy first so you know what you are targeting. We have multiple layers of muscles to provide the immense amount of movements the body is capable of. Generally, your smaller muscles responsible for posture and small unassisted movements are the deepest layer. In your back, these would run between your vertebrae (spinal bones), ribs, and scapulae (shoulder blades). The second layer consists of larger muscles that work with other muscles for larger movements. The outermost layer has the largest muscles, covering a sizeable area and responsible for our most significant movements. During a massage, the larger muscles need to be relaxed first to be able to get through them to the underlying structures.

Find a wall that has nothing on it that you can use. It should be clear past your head and 1 metre across. Place your back against the wall and drop the ball in between your shoulder blade and 7th Cervical Vertebra (to find this bone, bring your chin to your chest and feel for a bony prominence where your neck meets your back. Starting with lighter pressure (do not lean into the wall too much, to begin with), start to move slightly back and forth to massage your middle trapezius muscle (outermost layer). As you feel the middle trapezius relaxing, you can start to lean into the wall more to create more pressure, you can also introduce some up and down movements to perform “cross-fibre” massage. This will now be getting into your Rhomboids (middle layer). These 2 muscles can develop a stretch weakness. When we hunch over, these muscles are constantly in a stretched position and therefore tighten up to try to come back to neutral. If you find a lot of tension in this area it is recommended to do some strengthening as well. You can consult a Kinesiologist (like Paul Bradshaw at KurSpa) or a personal trainer to create a safe training regime for yourself.
Next, bring the ball up a little higher to get into the upper trapezius muscle. This is the muscle that gives the upper curve where the shoulder meets the side of your neck. It can feel very good to give it a squeeze to find where it is situated. Move side to side to get into the whole muscle. Once it begins to relax, you may feel a “crunchy” bit of muscle near the upper corner of your scapula closest to your spine. This is your levator scapulae, part of the middle muscle layer and can be responsible when you have a burning sensation in your upper back. These muscles can generally take a good deal of pressure so see where your edge is, keeping on the side of less pain, please. A good rule of thumb for massage is the deeper you go, the slower the movement. Breathe into the sensation. You can even stop the movement of the ball altogether and deepen your breathing, creating the movement from inside your body.
Bring the ball back in between your scapula and spine and lean forward just enough to let the ball fall down beside the bottom of your scapula. Now it’s time for some squats. Stand up tall and bend at the knees to roll the ball up and down the upper half of your spine. We are getting into the Erector Spinae muscles now. These are the long muscles that run beside your spine and keep you upright and also help extend the spine. These muscles are working all the time unless you are laying down or sitting against something, so they need lots of love! When you are using the rolling ball, start with faster lighter movements to warm up the area then slow it down, even stopping on small areas of tensions, or what some may call “knots”. These can be areas in the muscle where the fibres get stuck together (adhesions) and do not move as freely.
As the shoulder is a 360 degree joint, we need to get into the side and front as well. You can do both shoulder posterior massages, or, work all aspects of one shoulder and then the other, the choice is yours. As long as there is not sharp, piercing, stabbing- or electrical-like pain, you can do whatever you like.
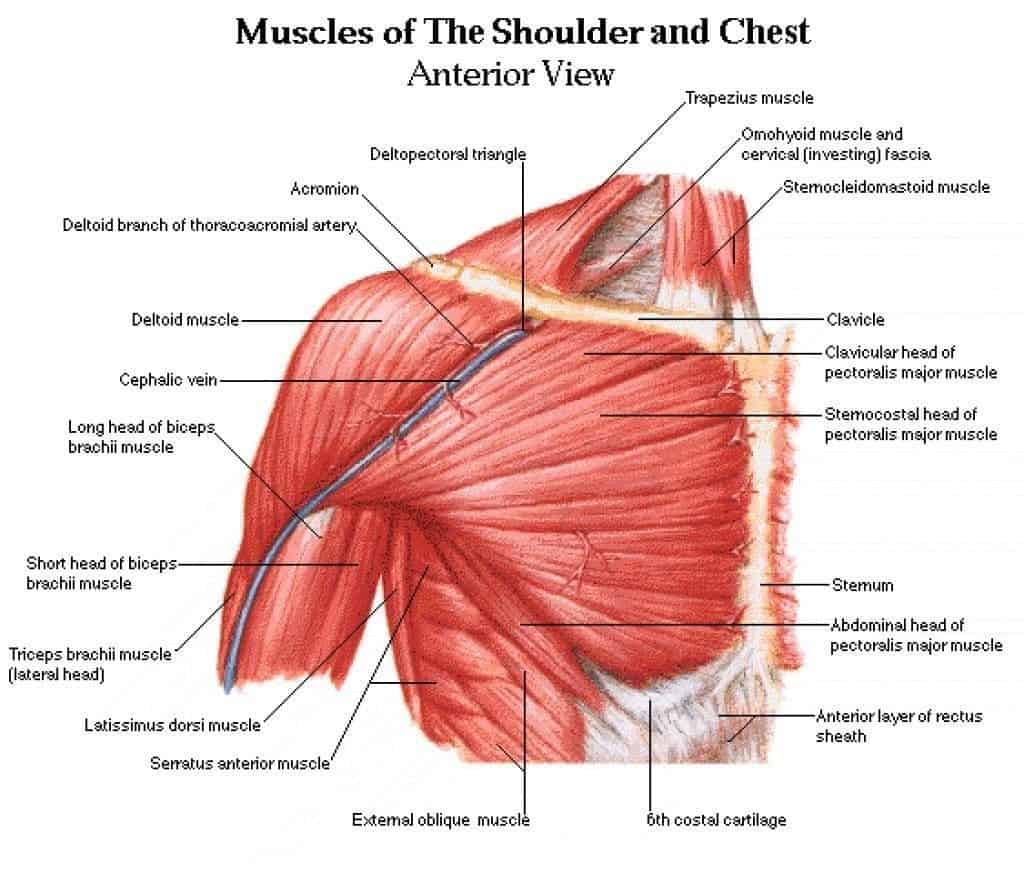
There is not much to massage on the outside of the shoulder, really just the deltoid muscle. This is what gives us the cap looking bulge at the top of the arm. Turn yourself sideways to the wall and place the ball at the top of the arm. Start with light circles around the whole area to warm it up, then you can start to increase the pressure. Play with up/down and side to side motions to feel the difference. When you move the ball up and down, you are working with the direction of the muscle fibres, providing relaxation and a small stretch. Side to side motions will work across the muscle fibres and could help break up any adhesions within the muscle. That’s it for this area.

Now turn and face the wall. We are going to get into the front chest muscles. The outermost layer is the Pectoralis Major muscle, commonly known as the “Pec”. This muscle is large and covers the whole front of the chest. It runs from the Sternum (breastbone) and inserts into the Humerus (upper arm bone). It is responsible for bringing the arms across the body and stabilizing the arms when they are raised in front of the body, such as in a push up. To massage this area, you will have to be very close to the wall. Place the ball right underneath the clavicle (collarbone) just out from the centre of your chest. Move the ball slowly back and forth just under the clavicle. Slowly drop the ball a little bit lower with each pass to get the entire muscle. Ladies, we can only go so far until we run into the breast tissue, so go as low as is comfortable for you. Once you have gotten into all the muscle, bring the ball into the recessed groove just below the area where the chest meets your arm. Now lean into the ball and move your arm up and down along the wall, like you were trying to make a snow angel. Again, we are creating the movement from within and moving our muscles under ball instead of just moving the ball. Please be aware of any shooting or electrical sensations when massaging in this area, our brachial plexus (bundle of nerves that innervates the arms) travels through this area. If you experience any of those sensations, adjust the placement of the ball to get it off the plexus. We want to massage muscles, not nerves.
A lovely way to finish is to lay on the floor and place a ball behind each shoulder and just let it slowly work its way into the area. Hopefully, you now feel less tension in the areas you massaged, perhaps increased range of motion in your shoulders and a lightness through the neck, perhaps your head doesn’t feel so heavy to hold up. Another benefit of self-massage is when you do go for your next massage, you will be able to really communicate the areas that not only need a massage but respond well to it. The more you can learn about your own body, the easier it is to communicate what it needs to health care professionals.
Stay well and see you next week when we dive into our lower backs and hips.


